Live Data and Datalogging Through ProECU


Live Data and Datalogging Through ProECU


Datalogging

Data-logging is a powerful feature of ProECU that can be used to obtain a highly detailed representation of engine operation.

It can display and record (log) a number of engine-running variables, and show up areas of calibration that have room for improvement. And, of course, it helps us immensely with troubleshooting and investigating specific problems.

How to log

With the Licence Key dongle already connected, execute the ProECU program then connect your PC to the engine ECU using your ProECU interface cable. You’ll know if you’ve successfully established communications if you get a green bar at the top of the ProECU window and the little indicator light on the interface plug illuminates.

Fire-up the engine and on the PC screen select File, Open ROM. Browse the menu to find the ROM you flashed to the ECU, and open it.


A particularly handy feature of the program is that it supports drag and drop, so if the ROM is, say, on your desktop, all you need do is drag it onto the toolbar of ProECU.

Looking at the contents of the ROM file (below), you will see a lengthy list of variables that can be logged, each one selectable via its own checkbox; obviously choose only those that are relevant to the task in hand, to keep things simple.

It’s a good idea on your first data-logging session to configure your Live Data window; you’ll want to set up a few things in the window so you can set your preferences as the default.

We recommend that you opt to display the minimum and maximum value columns for each parameter (Live Data &rarr Name, Units, Current) so that you have an idea of their range. Once you’ve selected your preferences, click View, then Save Rom Editor Layout as Default to keep the configuration.


Now click on Map Access (top centre, above) to start the Live Data flow; the button will become highlighted and a new green status bar will appear above the list of variables, confirming an active connection and that data is streaming from the ECU; you’ll also be viewing real-time data changes in the categories you checked.

When the status bar bears a red rectangle it means nothing is currently being logged; to commence logging click on Log To File and you’ll see the red rectangle change green. You simply click the button a second time to stop the logging.

This will produce and save a time-stamped log file to the default logging folder, which can be found at C:\EcuTek\MapAccessLogs. For convenience, the full path and filename are revealed when you position the mouse cursor over the Log To File button.


Setting Up Autologging

An auto start and finish of data logging feature can be set up in ProECU. It can be used to automatically start and stop logging to file making each log more repeatable and easier to review.  To set up the feature simply

  1. Open the ROM you wish to log, ad go to the logging drop down

  2. Select "Setup Auto Logging"


  3. Use the drop downs to select the parameters and thresholds you wish to start and stop logging


  4. Select "Done"

  5. Make sure Auto Logging is switched on


  6. This will automatically convert the display units to the set values on the Dashboard and the logging software.


Logging Profiles

How to create a logging Profile

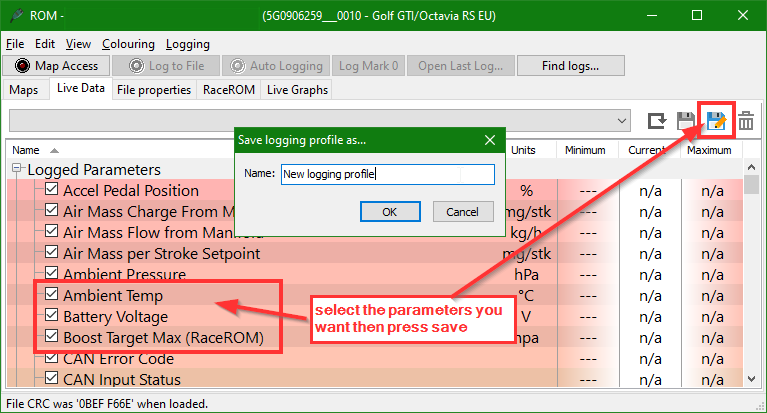
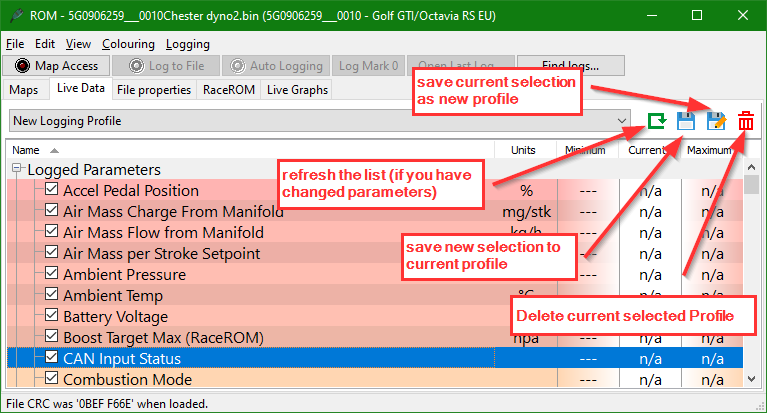
to create a logging profile open the ROM and go to the live data tab, then select the parameters set up you want and press the save as button, and name the profile

this will then save it in the default directory and alow you to access modify and save the file as you need.

How to apply a logging Profile

Simply use the Live Data Tab to view the parameters ad select the drop down and any of your save logging profiles

How to import a logging profile from a tuner

  • You can use the logging profile created by a tuner in ProECU as well as ECU Connect as well to make sure you it logs all of the parameters for you.

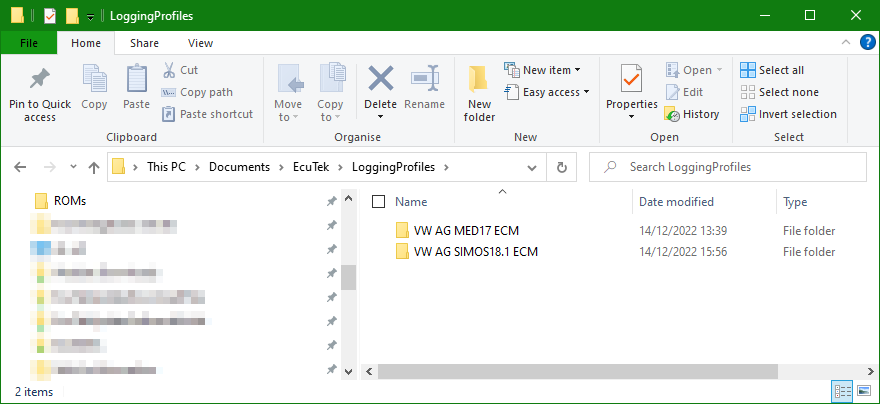
  • Create the folder that references the logging profile e.g. C:\Users\Lucan\Documents\EcuTek\LoggingProfiles\*Vehicle type* folder, alternatively generate this folder automatically by pressing save profile and making a default profile etc

  • Then simply copy the .elp file your tuner has sent you into the correct folder using the drop down to select the profile.

How to Upload a Logging Profile to EcuTek Cloud

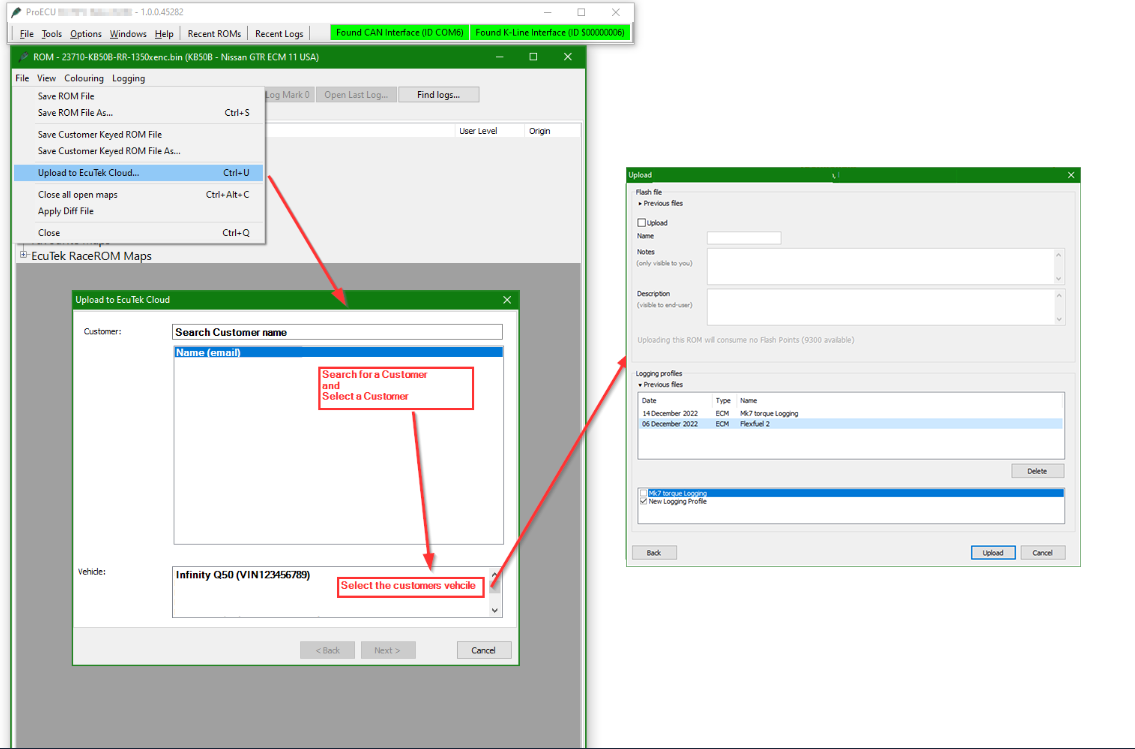
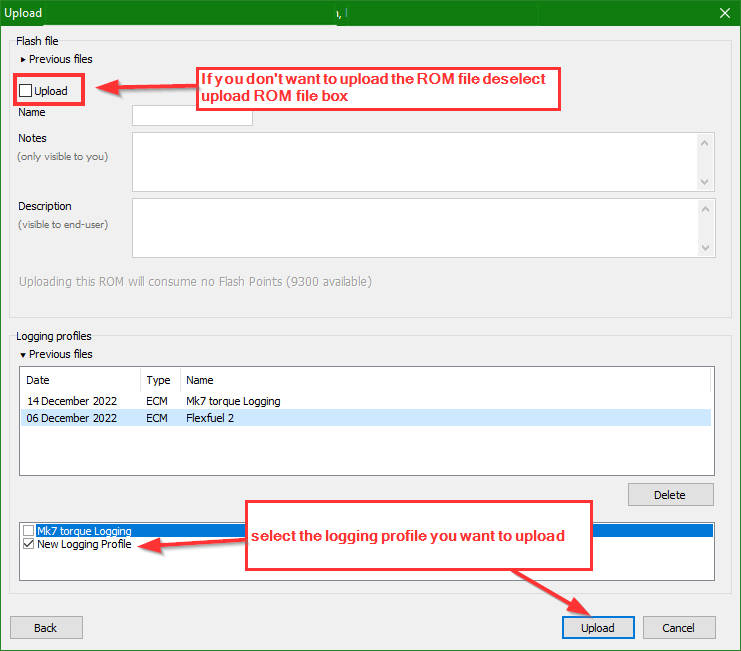
These logging profiles can be sent to ECU connect using the logging "Upload to cloud" or  "Ctrl + U" then selecting the customer profile you would like to upload to

then selecting the logging profile you would like to upload and press the upload button, this will then send the profile to the users Cloud account.

To apply a logging profile in ECU connect see the following instruction

ECU Connect: Datalogging Apply A Logging Profile a Tuner Sent 


Contact Us:

EcuTek Technical Support

support@ecutek.com

(+44) 1895 811200

When dialing from within the UK, the country code is not required so dial 01895 811200


Open Hours

Monday to Friday 9:00am - 5:00pm BST (UK Time)

(4am-1230pm Eastern Standard TIme US)

Visitors by appointment only


EcuTek Tehnologies Ltd.
8 Union Buildings
Wallingford Road
Uxbridge, UB8 2FR
England

VAT No: 
GB 235 2616 23